Pages

Friday, April 30, 2010

Lemonade Cake

I attended a MOPS recipe exchange last night. This is the second recipe exchange I've been to. At first, I was a little skeptical that 'exchanging recipes' could be fun. But in reality, it's just a code phrase for 'getting together, eating, and talking'. Everyone makes their recipe to share, brings a copy of the recipe, samples the food, and talks. At the end, you get a copy of everyone's recipe in a packet to take home!

I made a lemonade layer cake which is really good and as long as you don't mind grating a lemon peel, it's not too hard. My husband and I loved this recipe when we made it at Easter.

lemonade cake

Thursday, April 29, 2010

Tip of the Day

I used to hate emptying the wastebaskets (small ones in the bathroom/bedrooms). But then I started lining them with plastic grocery store bags. Much easier than dumping all the waste into a large bag; instead you just pick it up and go.

If you already do line your wastebaskets, a real time-saver I've started is putting 3 extra grocery bags in the bottom of the wastebasket and then putting the top bag out as normal. That way, you don't have to remember to bring a bag every time you empty it! Easy.

Wednesday, April 28, 2010

Ragged Edge Baby Blanket


I really like to sew baby things. They're small, so they don't take lots of time or fabric. A friend of mine made one of these blankets for our little guy. I liked this idea because it doesn't have to be 'perfect'. The cuts don't have to be measured. I just eyed them up. I used "snuggle flannel" from Jo-Ann fabric. I got it for about $2/yard when it was on sale a few weeks ago. I just love that stuff...so perfect for babies!

What you'll need:
-2 yards of contrasting flannel fabric
-thread
-sewing machine
-scissors.

Line up your fabric and cut to make each piece even. Make sure it is [relatively] square.


Pin the fabric layers together, wrong sides together.


Stitch around the perimeter. I stitched 7/8" in from the side. Your machine probably has lines etched into it to show how far you are from the edge. When stitching around the perimeter of the blanket, make a square corner. (Pick up your machine's presser foot and turn the fabric 90 degrees.)


You're going to make a square cut at ever corner. Cut just to the stitching; not into the stitching!

Start cutting the edges. Make sure you do not cut through the stitching! Just make the cuts evenly spaced. I wouldn't bother measuring. Just eye it up.

After you get all the edges cut:


You're done! Put it through a few wash/dry cycles and the edges will look nice and ragged! The flannel will feel softer, too.

Tuesday, April 27, 2010

Homemade Hand Scrub


This is a homemade sugar and honey hand scrub a friend made me for a gift. It is GREAT! You rub it onto your hands for a few minutes and then wash it off. Then moisturize! No chemicals additives. It is a really inexpensive way to make a small gift.

Want the recipe?
* 1/2 cup brown sugar
* 1/4 cup olive oil
* 4 tbsp. honey
* 2 tbsp. cinnamon

Growing Herbs

This is a basil plant:

I'm going to start growing basil and try not to buy it at the store anymore. Then, I might try growing all my own herbs. So much less expensive. For example, this cilantro cost $1.99 at Giant Eagle and doesn't even look all that fresh:


I could probably buy a whole cilantro plant for $4.99 somewhere. I've also heard that herbs don't die off over the winter and they'll grow again for summer, so no need to repurchase and replant!

Saturday, April 24, 2010

Paying Bills Frugally

Thought this wasn't possible? You could save money on postage and man-hours paying bills online. The hardest part is connecting your bank account with the service; but that isn't really very hard!

Think about it: most people have cell phone, internet, medical bills, credit card (usually more than 1!), mortgage payment, and utility payments. Do you mail in a check every month? Postage isn't getting any cheaper! At $0.44/payment, that's 7 stamps per month (at the least). That's $3.08 per month or $36.96 per year gone to the federal government. Just take the 25 minutes and set up your online bill payments.

So much easier. You could probably set it up to automatically deduct, but we haven't gotten that trustworthy yet.

Friday, April 23, 2010

Frugal Tip of the Day

Don't buy expensive breakfast cereals. Instead, buy oatmeal or Bulgar in bulk. Add fruit, nuts, or granola to the top (sugar or honey, too!) and be healthier and wealthier with just a few easy minutes.

We love oatmeal with raisins, strawberries, honey and a little milk. In our humble opinion, it is best cooked on the stove.

Thursday, April 22, 2010

Babysitting Exchanges

While I thoroughly love having a little guy, I sometimes miss the ability to go out with just my husband and be free of responsibility for just a few hours. (Meaning: I miss the little guy, but it’s the carefree feeling of not needing to meet a need, be it rest, food, beverage, change of scenery, entertainment in the form of silly song or dance routine!)

However, since I’m not currently gainfully employed, we can’t afford the luxury of hiring a babysitter and going out. We’ve spent many weekends in, meaning we’re home by 7:30 (if we went anywhere!) to put our little guy into bed. And that’s fine with me. But what to do the one time every one-two months we should go out as just a couple?

We’re blessed with many local friends at the same stage of life-meaning they have young kids, too. Some also don’t have local grandparents to come over and babysit. A few times, we have been able to go out with just the two of us because of one of our friends allowing our small child to come over for an hour or two. It has been a great way to save money by not paying a babysitter and for us to get some ‘couple time’ even if we just go out for coffee.

I’ve told my husband that at this point, he could take me to McDonald’s and I’d be thrilled. I love being a mom, though and wouldn’t change one thing about our lives.

Foaming Hand Soap

I love foamy hand soap. Since it is more expensive, I don't usually buy it. I just found out that you can make it yourself!!

First, you're going to have to buy the foamy soap so you can save the bottle (you need the nozzle for the foam). Next, you'll need your regular liquid dish soap or liquid hand soap. In the empty foamy bottle, combine 2 parts of water (that's right, H20) with one part regular liquid soap of your choice. Shake and use!

Wednesday, April 21, 2010

Cooking from the Freezer

I like to try and plan meals in advance. I love the idea of making food and freezing it so I don't have to cook every day, but sometimes I can't think of meals that will freeze well. This is one I recently made:

Spaghetti Pie
~enough for 3 pie plates~ (you could use a 9x13” pan and an 8x8 square pan)

1# spaghetti (do not use tube-shaped pasta, make sure it is flat)
5 egg whites, divided
2 cups ricotta cheese
1 cup parmesan cheese
1# ground beef or ground sausage
1 jar of spaghetti sauce
1 cup shredded mozzarella cheese
Optional spice ideas:
Red pepper flakes
Basil
Parsley
Garlic Cloves (or garlic powder)
Oregano

Spray three cooking vessels (pie plates, pyrex dishes) with cooking spray. Cook the spaghetti according to the package directions and drain.
While spaghetti is cooking, cook beef or sausage in a skillet.
In a small bowl, mix the ricotta cheese and 2 egg whites along with any optional spices.
In a large bowl, mix the spaghetti and parmesan cheese with 3 egg whites. Press the spaghetti into the pie plates to form a ‘crust’. Layer the ricotta cheese/egg white mixture on top of the spaghetti. Press down with the back of a spoon. Divide the cooked beef or sausage evenly over the spaghetti. Top this with the spaghetti sauce. Sprinkle mozzarella cheese on top of everything.
Cover tightly and freeze. Thaw in the refrigerator.
To bake, preheat oven to 350 degrees. Bake for 25 minutes, uncovered, or until heated through.

Shampoo Sample Excess

We have a ton of shampoo, conditioner, and lotion freebies from hotels and samples we've received via mail. Not only are they unsightly, taking up way too much space in our home, but it is a virtually free product (since many of the samples have come from business trips).

Instead of sighing with disgust next time my husband brings home three sets of shampoo and conditioner from his next business trip, I'm going to view it as an opportunity to put off our next purchase of shampoo.

I won't have to buy shampoo for a year!

Sunday, April 18, 2010

Cutting Back on Disposable Products

When we were first married, I used to insist my husband and I purchase a toilet brush with a disposable head. I've come a long way since then. We now use normal toilet brushes.

We used to use paper towels for everything. However, once our little guy started eating, he was getting really messy. We used more paper towels than ever because the dishcloth from the kitchen sink seemed way too yucky to wipe his precious little face with! Then I decided to cut up the abundance of 'free t-shirts' my husband had hoarded for ages. He willingly gave them up to this worthy cause. Now we launder the t-shirt rags several times per week instead of using rolls of paper towels.

The next disposable item I am phasing out are Swiffer cloths. I can't believe I haven't considered cutting my own Swiffer-sized cloths out of fleece before now. They will pick up dust just as well and can be laundered with the other rags I use for cleaning. Not only will this be a one-time cost instead of every month or so, I won't have to store the large boxes of cloths. I had been buying the store brand instead of Swiffer brand, anyway, but so much money can be saved.

DIY Frappaccuino

Did you know that you can make a Starbucks Frappaccuino at home? Save yourself the $4! Probably some calories, too. It's easy. You have to plan ahead a little bit and make some extra coffee and pour it into two ice cube trays. Freeze it.

Then gather your other ingredients:
ingredients to make frappaccuinos at home1 cup half and half
1/2 cup sugar
1/4 cup non-fat dry milk
1 tsp vanilla
a few extra ice cubes (use approx. 4 cups of ice total with the coffee ice cubes)

Add the ingredients to your blender and make sure you add the ice last. We have a Vita-Mix blender (it is a wedding gift we've used a lot!) Blend for about 30 seconds to 1 minute starting on low and switching to the high setting. You will need to 'tamp' or force the ice down toward the blades. If you blend too long, you'll have it too melted.
Then you just pour and enjoy!
DIY FrappiccuinoMy husband prefers to eat his with a spoon with various toppings, like (???) cereal (???):So easy. This recipe will make about 3-4 small Frappaccuinos. I think this is probably healthier than Starbucks, too, because they tend to use artificial sweeteners in the syrups or flavorings. "Sugar-free" anything is almost always a bad idea. If you don't want sugar in your frappaccuino, you could use honey or molasses. We haven't tried that yet.

Saturday, April 17, 2010

Make a New Screen Door

Our front door's screen had a hole in it. For 2 years. When we were putting in our patio (a DIY project with the help of my DIY dad!) we managed to put a board through it.

We hadn't gotten around to replacing it. Good thing. Because if we had simply replaced it, we would've spend WAY too much money. We may have either purchased a whole new door or just a screen. Probably would've spend at least $80 or so. However, my hubby went to the hardware store and bought a re-screening kit for about $11.

In a few relatively easy steps and the time of under an hour (while the little guy took his afternoon nap!) we had a new screen for our door.
1) Remove the old screen. This is the fun & easy part. Screens are connected to the door with a piece of slightly compressible rubber cord shoved into a groove. Just remove the cord and the old screen pops right out of the door's frame. 
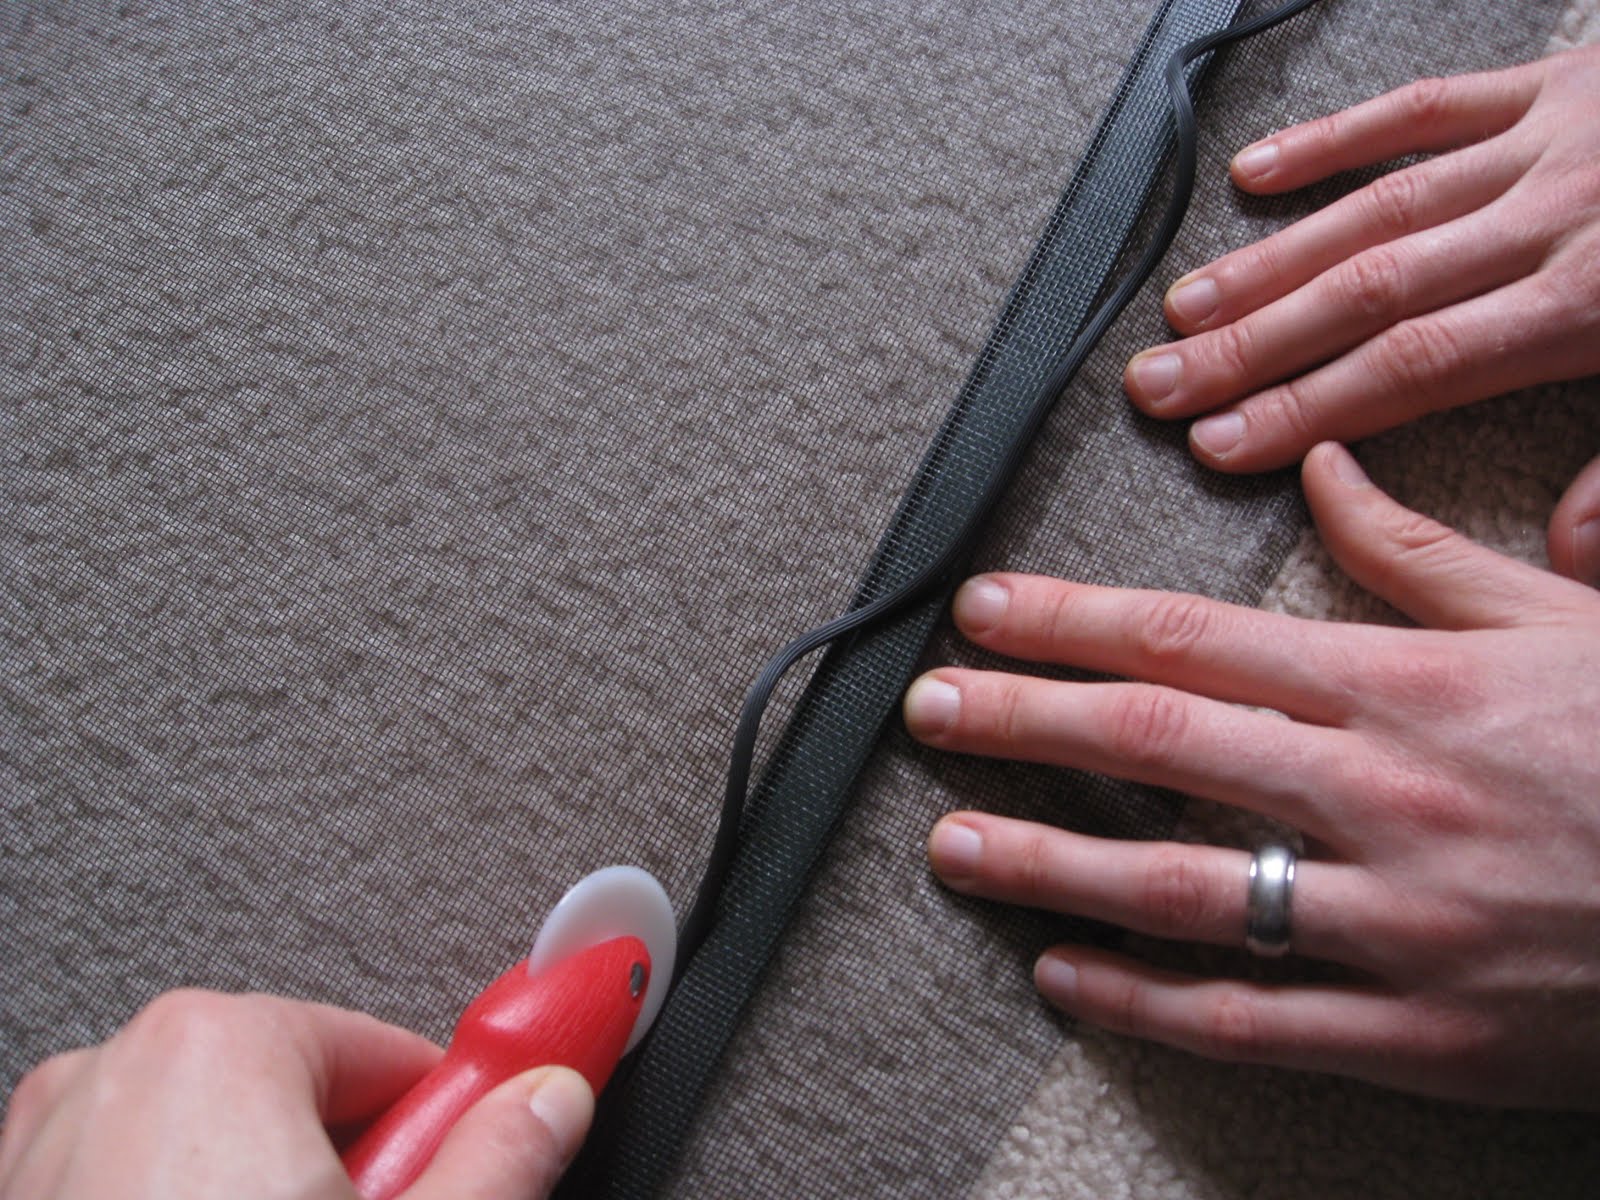
2) Unfold the new screen over the door. It should be sized larger than you'll need. Lay the screen over the door frame (the grooved side of the door you removed the cord from should be facing up).3) You'll need two people for this next part. One person takes this round tool that looks like a pizza cutter (ours was made of plastic, it isn't sharp). One end is concave. Starting in one corner, person #1 will use this end to force the compressible rubber cord into the frame's groove. The second person makes sure that the new screen is taught and flat as person #1 continues around the entire frame. This takes some patience and is the most time-consuming step. It also gave my wrist a workout.4) Using a utility knife, cut off the extra screen all around the perimeter of the frame.

5) Clean up, put the door back together and you're done!

Cost: $11.
Glad we did it ourselves. Now you can, too!

Saving Money on Baby's Diapers

Diapers can be an enormous drain on a parent's bank account! We estimated a budget of $40 per month for diapers before having our little one last June. Some things we have done to help meet or reduce this $40/month cost:

1) Diaper samples! I got all the diapers below for free via online samples from Costco (you don't have to be a member to take advantage of samples!) and Walmart. I suggest Googling "diaper samples" or "free diapers" and some of the results will be to enter your name/address/email and they'll send you 2-4 diapers of a new brand or type to try. Sure, it may open you to spam, but my email has a pretty good filtering system. Free diapers are worth it to me.
2) Try Target's newer store brand (Up & Up). They cost quite a bit less than the name brands. Admittedly, we did not use them until size 3, so I can't swear that they'll work as well for a newborn. Beware, they aren't as soft as a name brand. However, they cost approximately $0.13 per diaper as compared to $0.24 for the name brand (size 3 pricing). We were using the Target brand during the day and the name brand at night. It worked for us.

3) We have a friend who works at a hospital. He offered to buy us the name brand diapers the hospital uses at a HUGE discount. We stocked up on the name brand newborn, size 1 and size 2 diapers for awhile and diapered our little one for a lot less. The cost per diaper was approximately $0.18 per diaper.

4) Then we got crazy. We bought some  Cloth Diapers
. I NEVER thought I would be a cloth diaper person.

I researched them and at first was overwhelmed by the choices available for cloth diapering. Prefolds (think old-school) are still common. These are the white diapers held together with a "snappi", which replaces a diaper pin, and covered with plastic pants. Then there are "pocket diapers" which are what we're using. Shown below is the diaper:
It has a pocket on the inside where one places the liner:If the diaper is wet, the liner is removed and thrown into the washable diaper pail liner. I made our diaper pail liners out of fleece (cost: approximately $9 for two bags). They could have been purchased for $12 apiece. If the diaper is soiled, it shakes out into the toilet and then diaper and liner are thrown into the diaper pail .

These diapers were not inexpensive. At about $18/diaper with 2 liners, they must be used about 75 times each before one breaks even on the investment. We have 12 diapers (which is enough for us). 75 x 12 = 900. After 900 changes (at approx. 6-7 changes per day) after 5 months of cloth diaper use, we'll break even.

The reason we went with the expensive diapers was because they actually change size. The legs and the waist have elastic that adjusts with buttons. This means as our child grows, they will still fit. The sizing chart says they would fit a newborn (7#) up to potty training (35#).

The washing isn't too strenuous. It would be much easier if our washer & dryer were not in the basement. We just empty the diaper pail liner into the washer, do a 'cold rinse' cycle with out any detergent. Then we do a 'hot wash' cycle with detergent. I hang them to dry on the rack in the basement to prolong their life. We'd like to use them on subsequent children to maximize our cost savings on disposable diapers.

Two caveats we've found:
~They aren't absorbent enough to be used overnight. We use a disposable diaper for overnight on our little one.
~Laundry detergent without any softeners must be used. The regular detergents found in the grocery store cause buildup with softeners and fragrances. I found a detergent without any additives at Trader Joe's (a wonderful grocery store) that isn't too expensive and appears to be working just fine. However, the 'recommended' detergents are only available online or from fancy grocery stores like Whole Foods. I may try one of these fancy detergents when I run out of my current TJ brand.

At this point, we've got cloth diapering down pretty well. I change our little guy 's cloth diapers 6-7x/day (plus one disposable diaper at night, assuming he sleeps all night!) For us, the cost savings will be worth it. We've been doing the cloth since February, so by July (5 months of cloth), we'll begin reaping our savings. If we cloth diaper a second child, we could be saving over $1,000 just not buying diapers. It all depends on when a child potty trains. Unpredictable at this point.

Friday, April 16, 2010

Peach French Toast Casserole

A friend of mine baked this yesterday and it was SO YUMMY. She says it was from her healthy cookbook! My little guy liked eating it, too. I'll be making it this weekend!

Ingredients:
1 large whole wheat baguette
4 whole eggs
4 egg whites
1 cup Skim milk
1 tsp vanilla
1.5 T brown sugar
1/4 tsp cinnamon
5 cups peaches, fresh or frozen, but we will be using canned.

Spray a 9 by 13-inch baking pan with cooking spray. Cut the baguette into 1/2-inch slices and arrange the slices in a single layer in the baking pan. Beat the eggs, egg whites, milk and vanilla. Pour the egg mixture over the bread in the pan.

In a medium bowl, toss peaches with 1 tablespoon of the brown sugar. Arrange peaches evenly on top of the bread. Combine the remaining brown sugar and cinnamon and sprinkle over the top. Cover and refrigerate overnight.

Preheat the oven to 350 degrees F. Uncover and bake for 40 minutes.

I think this is a frugal recipe. It doesn't require any special or expensive ingredients (I purchased a baguette today at the grocery store for around $2.) It will feed a bunch of people! Very spring or summer themed, too.

I am in a MOPS group (if you're a "Mother Of Pre-Schooler(s)" you simply must find a MOPS group!) and we often need to bring breakfast items for our meetings. I am keeping this recipe in mind for my next assigned breakfast day!

Spring Craft


I wanted to have some sort of spring decorations to celebrate the beautiful April weather we're enjoying here in NE Ohio. This craft cost me $0 because I love love LOVE glass jars and have a zillion in my basement! I also love scrapbook paper. I have a bunch of it and that's what I used for the letters.

I did not free hand the letters! I typed the word "Spring" into Microsoft Word and selected a fun font. Then I printed it out and cut them out. I traced the letters backwards onto the back of the scrapbook paper so that the lines would not show.

Here's a
frugal tip for printing: when printing something for a pattern or that doesn't have to be perfect, print in gray instead of black. I think it saves ink! Also, choose 'quick print' for anything you print. This also saves ink. Oh, plus...this was semi-exciting...yet relevant...choosing the 'Century Gothic' font saves ink! See the story here.

Another tip! I found out that Walgreens refills ink cartridges. Usually it is $9.99, far less expensive than buying a new one! They often have coupons in their circular (they come in the Sunday paper). However, on "Earth Day" they are doing it for only $1! Too bad I didn't save all those empty cartridges along the way!

I had to check to see what day "Earth Day" is, too. It is April 22nd.

Thursday, April 15, 2010

Covers for Journals/Photo Albums

Here is a sewing project! This cost me $0 because I sewed together many scraps to make these covers. The covers aren't beautiful (especially the larger one, which is covering a wedding scrapbook I made 5 years ago!) The intention of the wedding album cover was to protect the white cover from dirty fingers.
Both covers tie closed with a ribbon. Ribbon is one of my many interests.

I confess that I am not the greatest photographer.

Wednesday, April 14, 2010

Consignment Stores

I love children's consignment stores. I confess, I have tried thrift-store shopping for myself, and I can't do it. At least, I haven't had success quite yet.

However, there are two very nice children-only thrift stores in my neck of the woods, and when our little guy needs something, I try and check there first.

Yesterday I got very lucky: three pairs of shoes and one (practically new!) Gymboree outfit for less than $12. Granted, we didn't really need the outfit, so it may be classified as an 'impulse' buy.
As much as I love Target, I would be missing out on some great deals if I bought everything new for him there!

Sweet Potato Pancakes for Babies (or Grown-Ups!)

These are really yummy. I adapted this recipe from a baby cookbook because I didn't want it to contain milk for my little guy who is under age one. I am committed to keeping cow's milk out of his diet until that magical first birthday, when suddenly cow's milk is A-ok. (I am fully committed, except for the tiny bite of ice cream I shared with him over the weekend. Maybe it was two bites.)

But here's the recipe. My husband and I love them. Our little guy loves them. It's a hit.

Sweet Potato Pancakes

1 cup flour, either all-purpose or whole wheat.
1 T sugar (I forgot to add this last time but they were still good)
pinch of salt
2 eggs, beaten
1/2 cup mashed sweet potatoes
1/2 cup plain yogurt (we use Dannon, it must be this kind! No additives!)
1/4 cup water

Preheat skillet. Mix dry ingredients together. Stir in the wet ingredients until just blended, do not overmix! This is very important: test skillet by dripping water onto it, if it 'dances' you've got the right temperature. If not, keep heating. Spray skillet with cooking spray. Pour small circles of batter onto skillet; cook for 3-4 minutes per side, turning once. Remove and cool on wire rack.

These can be frozen! Thaw in refrigerator, reheat for 10 seconds in microwave on either side. Test temperature before feeding to your child!
Makes about 12 small pancakes.

The Many Joys of White Vinegar

Vinegar has so many wonderful uses. As long as one doesn't mind his or her home smelling like Easter eggs, white vinegar can be used (diluted 1:4 with water) to clean any surface in the home, including:
~Counter tops
~Showers
~Floors
~Refrigerator Interior
~Microwave Interior
~Windows
~High Chairs
~Laundry Odor Removal

I switched to white vinegar and water for much of my cleaning because I was worried about my crawling child's exposure to the hazardous chemicals usually found in cleaning supplies. Also, cleaning with white vinegar is far less expensive than buying 'natural' cleaning products. I purchased a $0.99 spray bottle at the discount store and can refill it nearly endlessly with my enormous $2 bottle of vinegar for a cost of next to nothing per use.

Tuesday, April 13, 2010

Monkey See, Monkey Do!

I'm a multi-tasker by nature. Right now, as I'm starting my brand-new blog, I am also trying to finish my local taxes, which were returned to me because I forgot to attach our W-2 forms!

Sometimes my multi-tasking goes a little too far and I feel overwhelmed. Like when I'm trying to keep my almost-walking child out of the tupperware drawer, have a blender full of orange mush I'm trying to puree for that child, cooking a dinner which includes making bread from scratch, and sewing Christmas stockings. But I still love to do all these things and sharing and chronicling their success (or failure) to anyone who cares to listen!

I've created this blog so that you see what I have done, be it a craft project, a recipe, or a frugal tip, and then you do it.

Monkey see, monkey do.